The Embeddable Audit Tool has been designed to be simple and easily editable. We purposely don't compress or obfuscate the embed code like other 3rd party tools do which explicitly prevent you from customizing the code.
Instead, we expose all the CSS in a simple code block above the HTML embed code so you can style form objects as long as you have some basic CSS knowledge.
All it takes is adding a few lines of CSS into the relevant sections to customize the look and feel entirely. If you have intermediate HTML knowledge, you can modify the form structure itself.
You can also add your own JavaScript functions (eg: extra form validation) or you can call other functions / systems onSubmit or onClick within the form.
The only customization recommendation we have is not to make any changes to the JavaScript code block as that can cause errors. Related to this, we suggest you don't move form elements around too much from their original ordering as some JavaScript references rely on the relative positioning of objects in the form.
Other than this, we strongly advise and encourage you to customize the form so it matches your website look and feel. It should feel like a natural part of your site experience and not feel like a tacked-on widget.
Like this embed form from Digital Butter:

We suggest this because we see agencies achieve higher levels of lead generation when they customize the form appropriately to match their website style.
In this guide we'll look at the 3 most common advanced customizations for the Embed Form:
-
- Advanced form validation
- Firing a Google Analytics or Facebook event during form submission
- Customizing the form field or submit button styles
But first, let's take a look at how the embed code is structured:
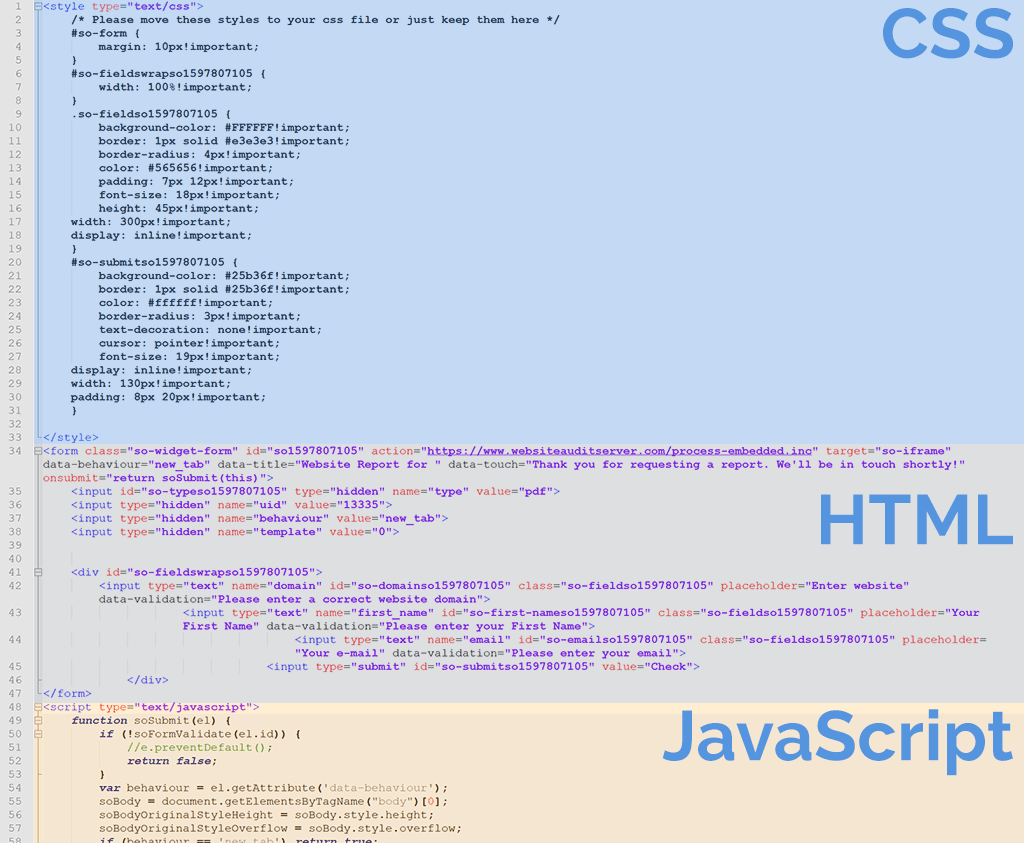
Exploring the Base HTML Embed Code
To generate the embed code, go to the Embedding Settings tab and hit the "Save Settings & Generate Embed Code" button. Below is an example of the base code.
You'll notice the first section is CSS, followed by HTML and finally JavaScript. You should customize the first two sections and leave the JavaScript as it is. As is suggested in the 2nd line comment, you can move the CSS section into your CSS file so it's all managed in one place centrally.
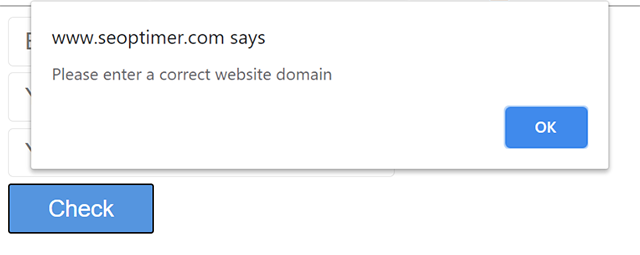
1. Advanced Form Validation
The SEOptimer Embed Form has simple form validation built-in by default. OnSubmit, the JavaScript checks all form fields for valid input and in the event there is invalid input, it triggers a JavaScript alert message in the browser like the following:
The two most popular alternatives for adding robust validation to the Embed Form are constraint validation and real-time validation:
Constraint validation
Check CSS-Tricks guide on constraint validation which uses contextual messaging on or around the form field as it comes into focus. This method pre-empts the user and guides them toward adhering to the expected input format or in the example below, at least entering something into the field:
.png)
Real-time Validation
CSS-Tricks also has a great guide on real-time validation which provides in-field validation to the user as they type. This can be as simple as iconography to indicate correct input on the form:

2. Firing a Google Analytics or Facebook Event During Form Submission
Firing tracking events like GA or Facebook for goal measurement or retargeting is a great way to leverage the traffic using your Embed Form. The best way to do this is with a Tag Manager tool like Google's own Tag Manager (GTM).
That way, you can install GTM as an empty container on your website and then manage all the tags and pixels from GTM itself without the need to dig into the code every time.
There are two ways GTM can fire events on the submission of a form on your website:
- Using the built-in form trigger when the form's submit event occurs
- Relying on a custom Event (line of JavaScript) which needs to be added to GTM's data layer
For most users, the first option is the best as its easiest to implement and works well. The SEOptimer Embed Form uses a standard HTML submit action when the user completes it so as long as you don't change the way the form submits data, then GTM's built-in trigger is the way to go.
You will need to create a new Trigger in GTM based on "Form Submission":
.png)
Also ensure you enable GTM's built-in "Form ID" variable. This variable will identify the Embed Form's ID from the form tag in the HTML.
If you end up removing the Embed Form's submit action and replacing it with custom JavaScript this will cause GTM's built-in trigger to not work with the form.
That's where you'll need to add a JavaScript call to notify GTM's data layer that an event has taken place. This approach is straight-forward anyway as it only needs to be done once so any future events you want to add can be easily done in GTM itself. The JavaScript will look something like this:
dataLayer.push({'event' : 'formSubmitted', 'formName' : 'WebsiteAudit'});
For step by step instructions on implementing both methods in GTM refer to Click Insight's guide.
3. Customizing the Form Field or Submit Button Styles
Rounded form elements
This example from Canadian digital agency Reach First is a great example of how a few lines of CSS can be used to modify the Audit Tool to match the look and feel of the website. In this case, they use rounding on all other input and button fields throughout the site:

Here we can see the "border-radius: 50px;" attribute is used to achieve the rounding effect on the text input field of the Audit Tool. Notice the right-side padding attribute is set to 160px to provide sufficient padding between the input area and the "Check" button. This prevents entered text from overlaying on top of the button.
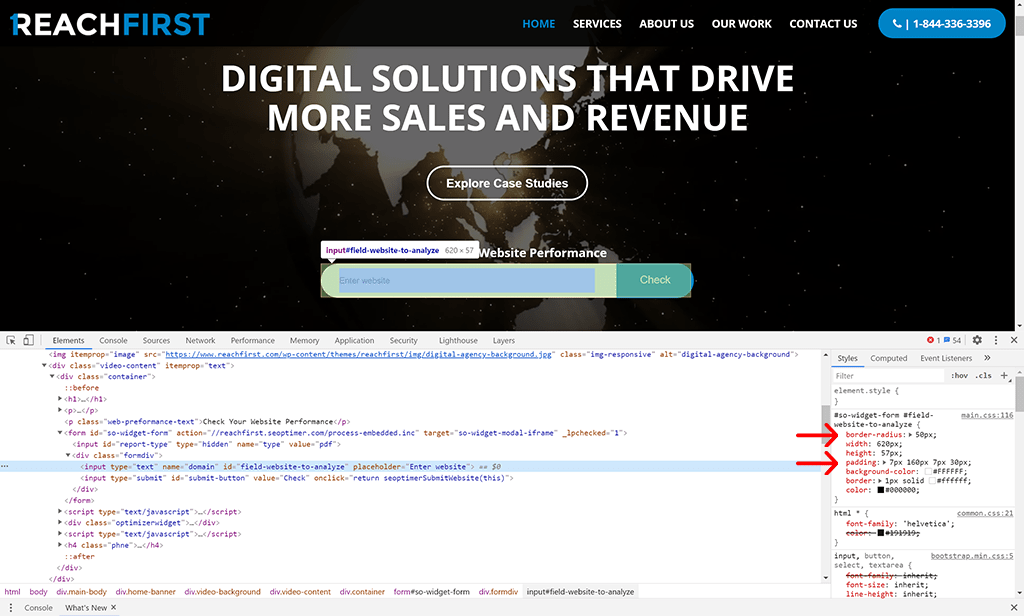
For the button itself, only the "border-top-right-radius" and "border-bottom-right-radius" attributes have been set to 50px to achieve the cohesive effect between the input field and the button:

Form Element Sizing and Positioning
Australian digital marketing consultancy, Stepps has integrated the Audit Tool very nicely into a separate "Website Analyser" landing page by using variable widths on the 3 form fields and moving the button down to its own full-width row:

The form element widths are relative based on the div container they are contained in. To achieve this, the width is set to a percentage in the CSS. For the "Enter your website" field, we can see this field has a 25% width:
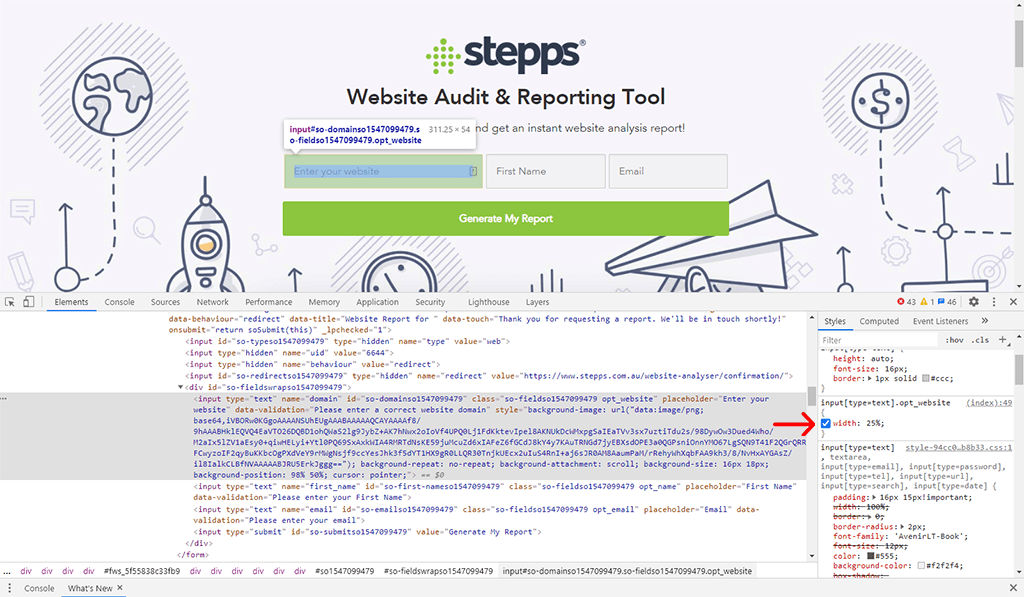
While the First Name and Email fields are smaller with a width of 15% each:

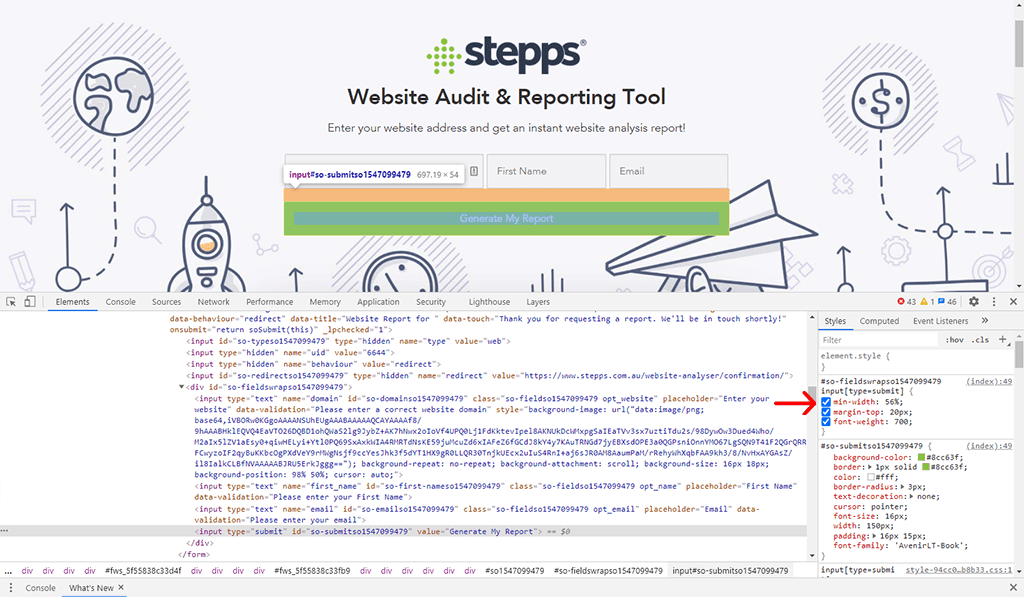
Finally the "Generate My Report" button has a width 1px wider than the sum of the input fields: 25 + 15 + 15 = 56%
These examples show how flexible and easy it is to update the Audit Tool CSS to match the look and feel of your agency's website. If you encounter any issues while installing the Audit Tool, check our full guide too!