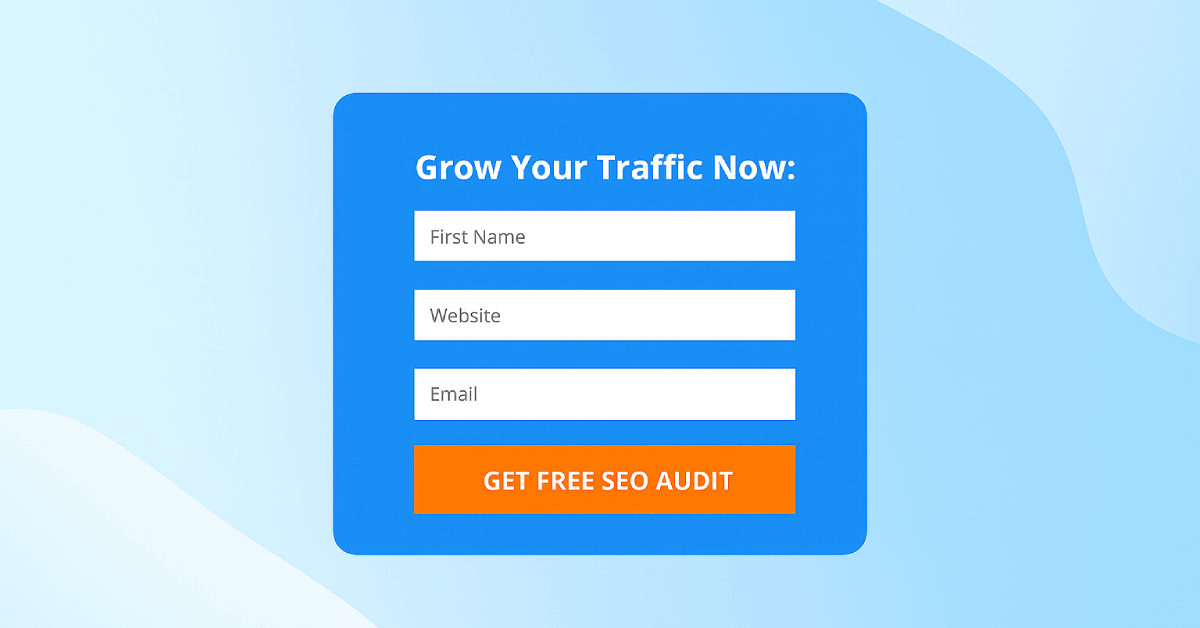
SEOptimer's Embeddable Audit Tool is a powerful lead generation tool for digital agencies.
Agencies using our White Label and Embedding plan can embed the Site Audit Tool into their agency website. This allows them to capture leads and provide SEO reports to prospective customers. This guide explains how to set up and install the Embeddable Audit Tool on your agency site.
Once you install the tool, your visitors can create free website audit reports on their own website (or indeed, any website). These reports can be white-labeled with your agency branding, colors and fonts. You can customize the report sections and even enable an email to automatically send to the visitor with their report attached.
How the Embeddable Audit Tool Works
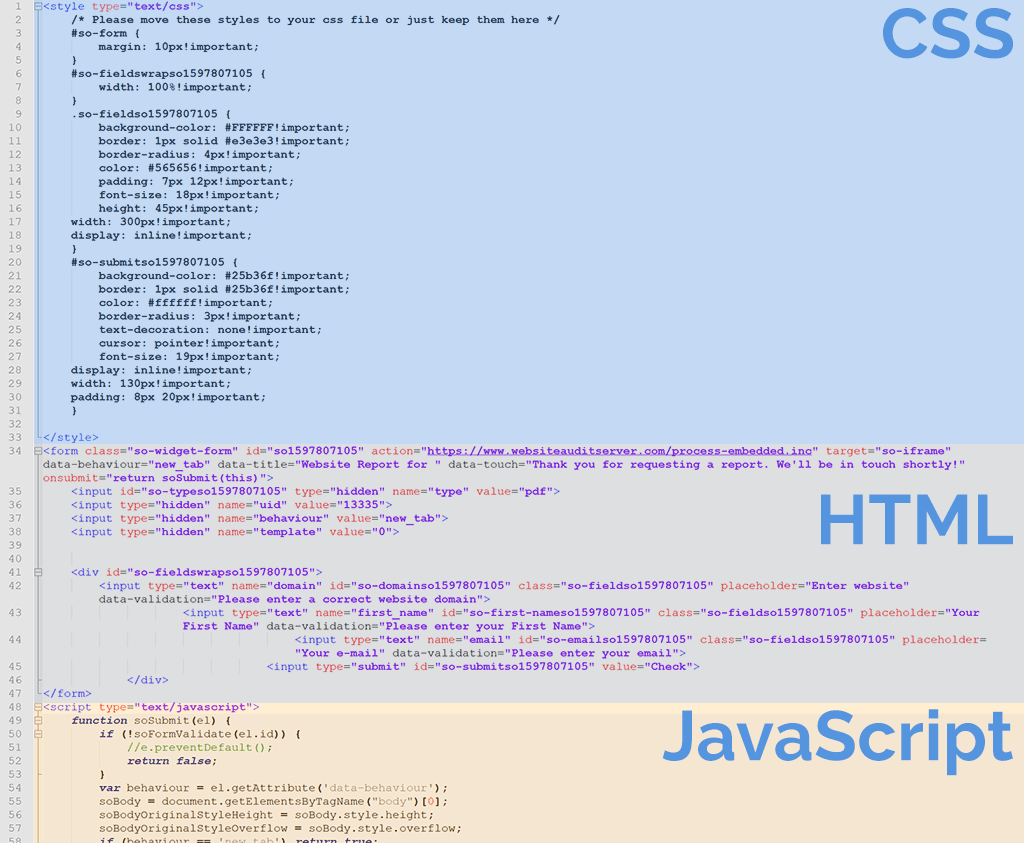
To embed the tool into your website you need to add a small snippet of code into your website’s HTML. By default, the form is minimal and simple however you can customize the form fields and style the form to match the look and feel of your website.
In fact, the embed form has been specifically designed to be simple and easily editable. We purposely don't compress or obfuscate the embed code like other 3rd party tools do which prevents you from making changes.
Instead, we expose all the CSS in a simple block at the start of the code so that form objects can be styled as long as you have some basic CSS knowledge.
.png)
When a user enters their details (eg: website URL and Email Address), you can configure the form to send you the lead data via email.
Aside from receiving an email with the lead data, all the leads collected from your embed form will also be populated in your Leads dashboard.
.png)
The Leads dashboard will include information from all the fields you've included in your form, the IP address of the user, the page the audit was submitted from and a PDF copy of the user's audit.
You'll also have the option to export your lead data via CSV, Excel, or PDF.
If you'd prefer to send the data to your own CRM or email service provider, you can enable a Webhook to push the lead data into your CRM via Zapier or perform any other supported action in Zapier such as notify a Slack channel, add the lead data to a Google Sheet, etc.
 (1).png)
.png)
You can also customize what happens when the user enters their details. By default, a white-labeled PDF audit report is created on the fly and displayed to the user.
They can either view this directly in their browser or download the PDF. Instead, you can remove the PDF option and just display a web-based version of the report in the browser or you can remove it entirely so that you can respond to the lead yourself via email with their report.
Configuring the White Label Report
If you decide to show the audit report to the user when they submit the form (either PDF or web report version), you will need to configure the report template. First, ensure you've completed all the required agency details on the Report Templates page. There are 6 fields to complete: logo, agency name, address, email, phone and website.
If you choose to display the PDF or web-based report when the user submits the form, these agency details will be displayed on the report when the form is submitted.
 (1).png)
Once you've added these details, you can also make further customizations to the audit checks and sections (turn sections on or off). You can also customize the colors and fonts used throughout the audit report.
 (1).png)
.png)
.png)
Hit the "Preview PDF Report" button in the bottom right corner to see a preview of how the user will see your report:
 (1).png)
Once you're happy with the layout and look of the report, hit the "Save Settings" button in the bottom left corner of the page.
Managing Multiple White Label Report Templates
Advanced users may want to set up a separate report template for the Embeddable Audit so they can customize exactly how these reports look. We find some agencies prefer to make these reports shorter as opposed to a full audit report used for consultations or client meetings.
If you would like to do this, you can create a separate template used for the Embed Tool by visiting the Report Templates page and clicking the "Create New" button at the top to define a new report template.
Call it something descriptive like "Embeddable Audit Tool Report". You can also select the report language, scoring type and whether you want to show or hide the detailed explanations for each check.
 (1).png)
You can then turn on/off different report sections and individual checks to control exactly how the audit report looks.
Once you've set up your Report Template it's time to set up your Embed Form. The first step is to ensure that you have selected the correct template. To do this, navigate to your Embedding Settings page and click on the drop down under Templates. Here you'll see all the templates you've set up on the Report Templates page.
The template will not only determine the branding and content of your audit report but will also determine the language for your embed form. If you've chosen a language other than English your embed form fields will automatically be translated to your template language.
.png)
Choose an Embedding Report Type
Next, customize how the form behaves when the user submits it. The "Embed Form Behavior" setting provides 4 options:
- New Browser Tab: this will open the report in a new browser tab
- Modal Box: this will open the report in a "modal box" on top of the page content (default option)
- No Report, just show "We'll be in touch" Popup Message: the report will not be shown to the user however a customizable confirmation message will be displayed
- No Report, just Redirect to Another Page: the report will not be shown to the user and they will be redirected to your desired URL
.png)
If you select either of the "Display Report" options, you can customize whether the report is displayed to the user as a native PDF file or as a web report:
- PDF Report: PDF generation will produce a branded PDF report in a new tab. They will be shown an initial loading screen and then directed to the report upon completion. They can view this in their browser or choose to download the PDF file to their device (default option)
- Web Report: Users will be directed to a web version of the report that loads natively in the browser
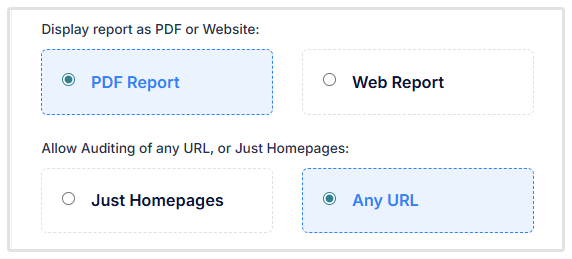
You also have the option to restrict users to only auditing homepages or any URL on their site.
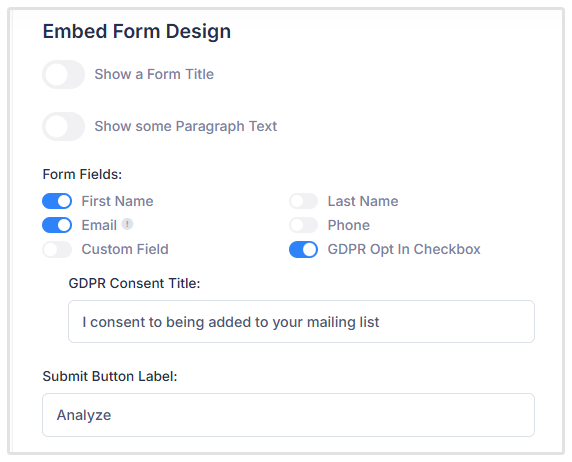
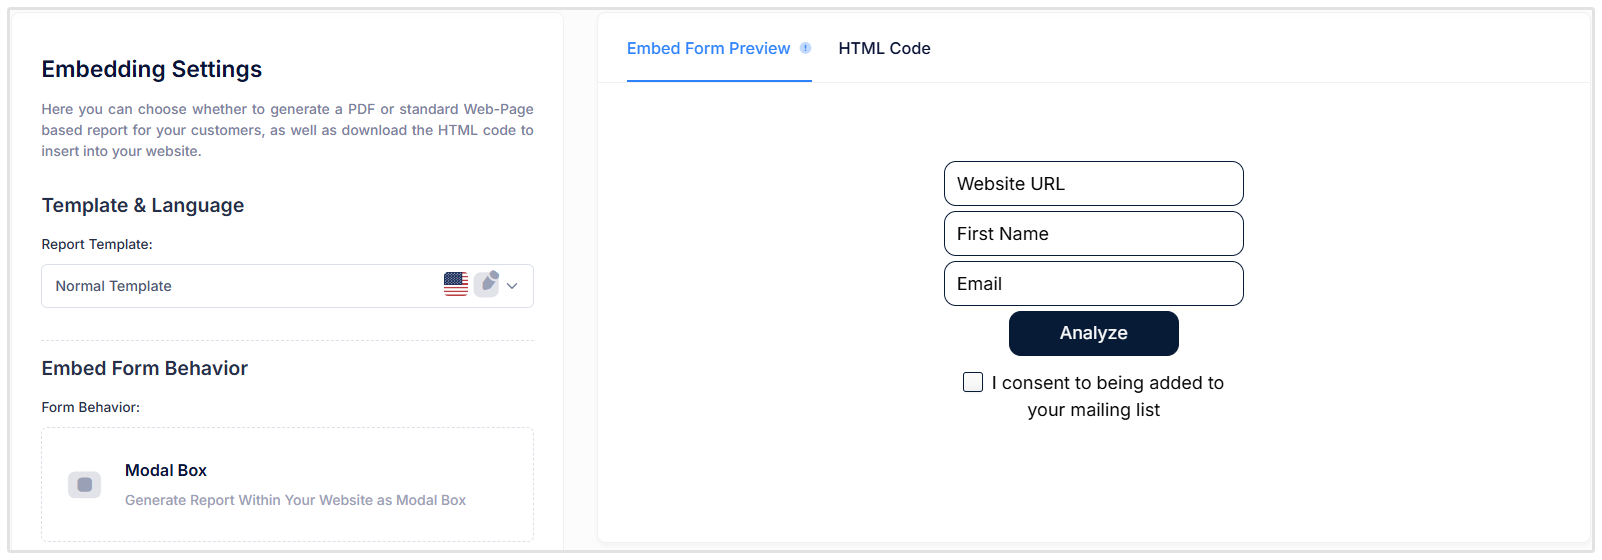
Next step is to customize the form fields. The "Enter website" field is mandatory. But you can turn on/off the other form fields.
We highly recommend you turn on Email and First Name so you can capture basic lead information. You can also set a Custom Field and make other customizations such as layout style and colors:
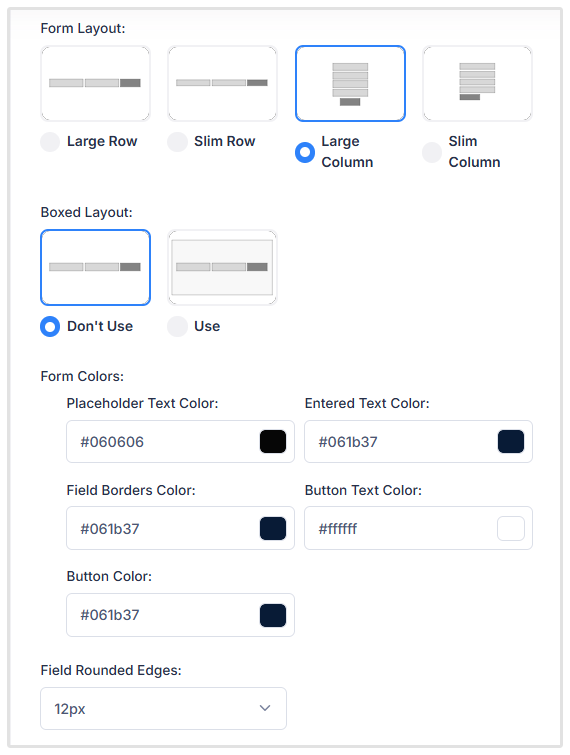
You can preview the look of your form on the right hand side of the page. Make sure that the Embed Form Preview is toggled on.
We've also added the option to create a Hosted Audit Form. The concept is similar to our Embed Form, except the form is hosted on our servers and you simply need to share the URL with prospects in order for them to access the hosted audit form.
.png)
Once you're happy with your embed form set up, hit the "Save Settings & Generate Embed Code" button at the bottom of the page to generate the HTML code:
.png)
White Labelling the Web Report Domain
If you choose the "Web Report" option as the delivery method of the report, you can white-label the domain by visiting the Domain Settings page.
.png)
By default, the report is served on a generic domain called "websiteauditserver.com". You can either use a subdomain with the format https://<your-subdomain>.websiteauditserver.com/<report-url> - this is the simplest option to customize the domain.
The more advanced alternative is to click the "Domain" tab and completely white label the domain eg: https://<your-custom-domain>/<report-url>.
This is the preferable option because the URL is fully white-labelled and appears to the user as a service running entirely on your website. Read our full guide on how to set up white label custom domains.
Installing the Code
Installing the actual embed form code requires either some website coding or backend CMS knowledge. Oftentimes it is better to give the code to your website developer to install for you.
If you have intermediate HTML knowledge, you can modify the form structure itself. You can also add your own JavaScript functions (eg: custom form validation) or you can call other functions / systems onSubmit or onClick within the form.
The only customization recommendation we have is not to make any changes to the JavaScript code block as that can cause errors.
Related to this, we suggest you don't move form elements around too much from their original ordering as some JavaScript references rely on the relative positioning of objects in the form.
Other than this, we strongly advise and encourage you to customize the form so it matches your website look and feel. It should feel like a natural part of your site experience and not feel like a tacked-on widget.
We suggest this because we see agencies achieve higher levels of lead generation when they customize the form appropriately to match their website style. For some inspiration, check out these great customer example implementations.
Once you've generated the embed code on the Embedding Settings tab you'll notice there are 3 different sections. The first section is CSS, followed by HTML and finally JavaScript. You should customize the first two sections and leave the JavaScript as it is.
As is suggested in the 2nd line comment, you can move the CSS section into your CSS file so it's all managed in one place centrally.
For installing the code on specific CMS', we've written 6 separate guides for some of the most popular ones:
- Installation guide for WordPress
- Installation guide for WPBakery
- Installation guide for Fusion Builder
- Installation guide for Wix
- Installation guide for Weebly
- Installation guide for Squarespace
Form Submit Notifications
If you'd like to receive an email each time a user submits the form, simply enable this option and define a "destination email address".
If your website has high volume and many users are submitting the form, we recommend disabling email notifications in favor of setting up notifications into a Slack channel or relying on the Webhook integration into your CRM (see section below).
 (1).png)
User Email Notifications
You can also enable an email to be sent to the user once they submit the form. You can also optionally attach the PDF version of the audit report and customize all aspects of the email itself including subject, title and email contents, logo, font and colors.
Some agencies don't show the report to the user when they submit the form and only attach it to this email notification which acts as a verification that the user has entered a real email address. This reduces the potential for the audit form to be abused by anonymous users running multiple reports and never leaving real details.
The email notification content can be customized completely. Some agencies include links in the email content to a calendar booking app so the user can schedule a meeting with them to discuss the report.
.png)
.png)
Below is an example of an email notification sent to a user who submits the audit form:
.png)
As you can see, the sender of the email is "[email protected]". It's purposely a generic domain and it's important to note that the sender name or email address can not be changed.
We can't impersonate your company email address as that would create a security risk and negatively affect the deliverability of the email.
In the Embed Form Email Settings, you can specify a "Reply-To" address so if the recipient hits reply on this email, it will be addressed to you.
You also have the option of customizing the email subject line and title by adding the Name, Surname, Email, Website URL, or Phone Number.
Note, the customization options that are available will depend on the fields that you've chosen for your form.
.png)
Preventing Spambots and Abuse
Below the Email Design options, is a "Spam Blocking" section. These settings enable you to prevent the submission of the form based on IP address, email or audit URLs if you identify abuse or spam activity.
.png)
All 3 fields can contain multiple values by separating each value with a comma (,). If you want to block emails from an entire domain (eg: Gmail) you can use the asterisk wildcard like this: *@gmail.com. If you want to block a URL and all its pages and subdomains, enter just the domain like this: website.com
If a blocked IP address, email address or URL is entered, the user will see the following error when trying to submit the form:
![]()
We've also added the option to restrict the number of reports a user can run per day via your audit form including a custom message that is shown when they reach the maximum number of reports.
Sending New Leads to Your CRM via Zapier
If your agency uses a CRM such as HubSpot, Salesforce, Pipedrive, etc, you can use the Webhook option to connect the Embeddable Audit Tool to Zapier. You can also follow these steps to setup new lead notifications to be sent to a Slack channel or in fact, any other app supported by Zapier:
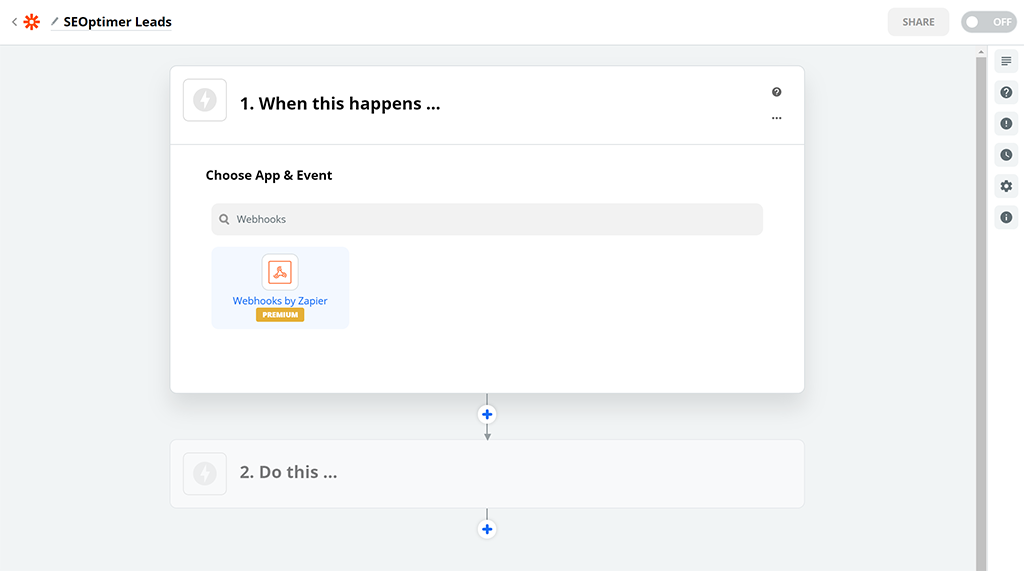
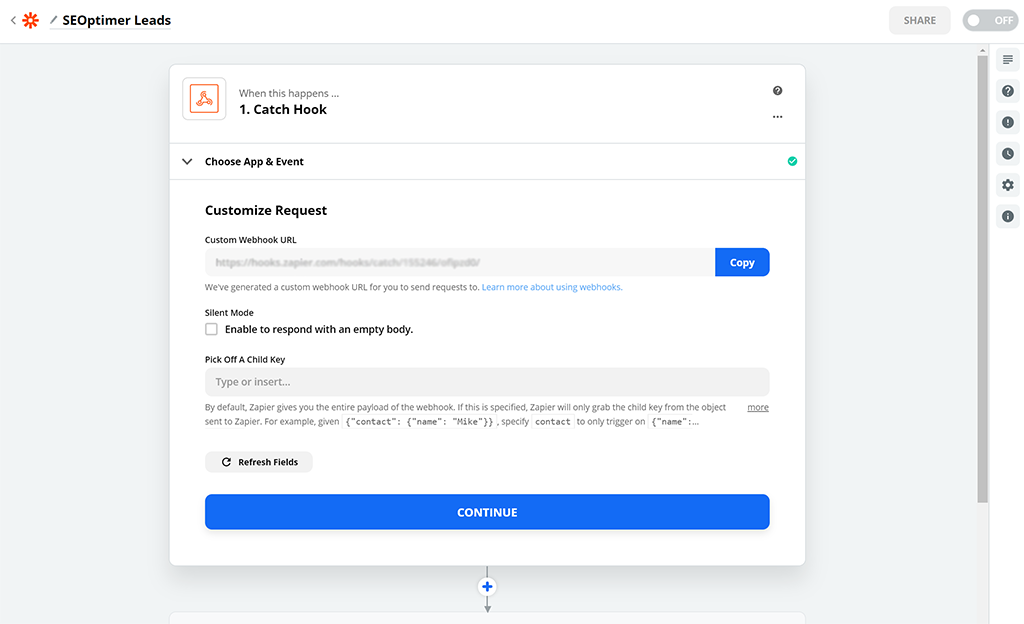
Open Zapier in a new tab and make a new Zap with the "Webhooks by Zapier" app (note this is a Premium feature so you will need one of Zapier's paid plans):
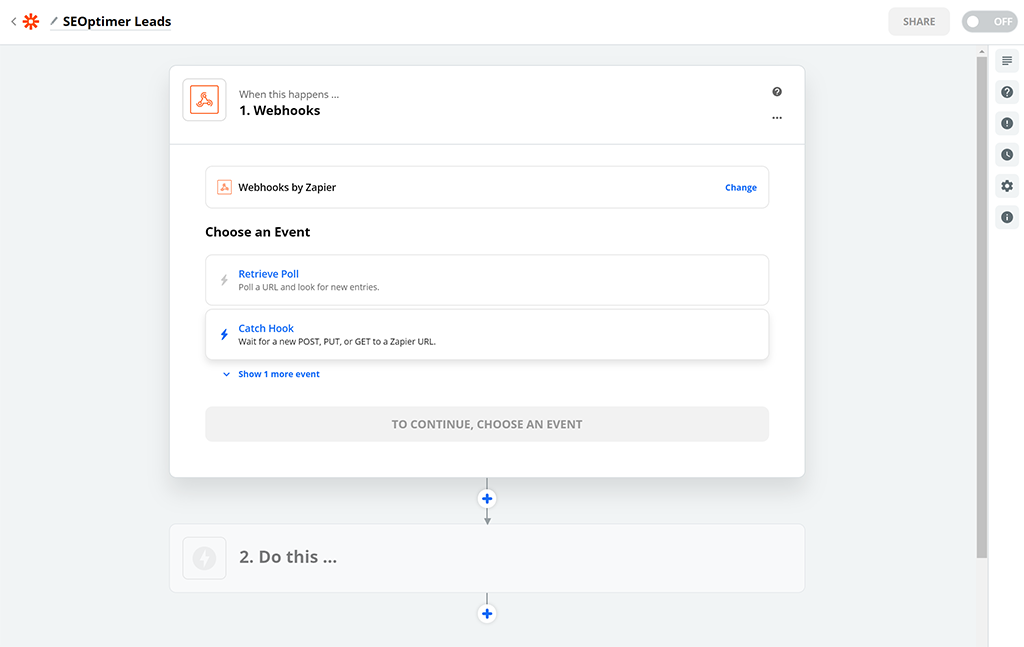
Next, choose the "Catch Hook" option:
Then, click the "Copy" button next to the Custom Webhook URL that Zapier generates for you:
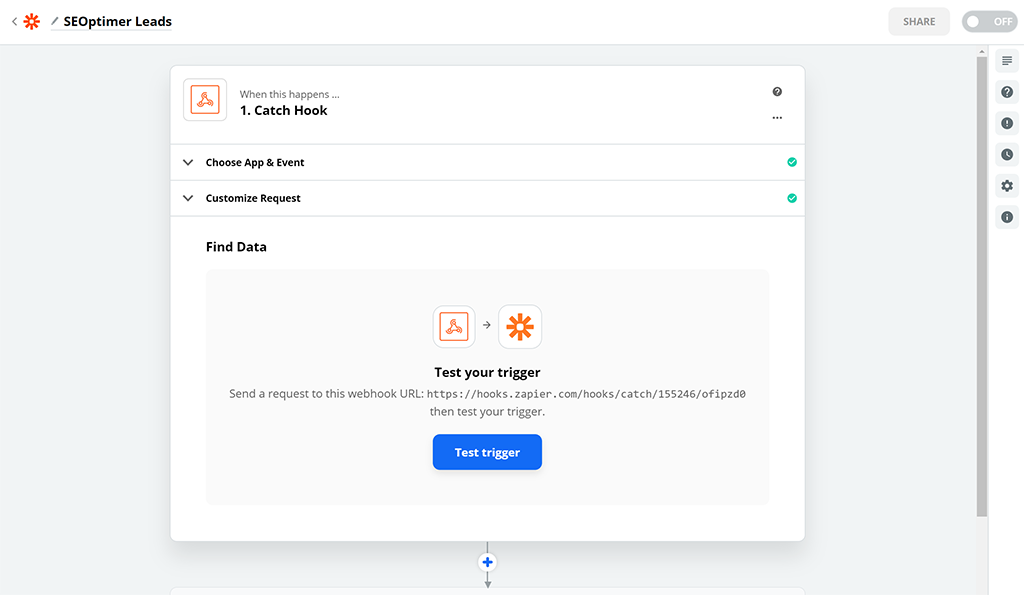
Click Continue, then switch back to the SEOptimer Embedding Settings tab and paste this URL into the "Webhook Handler URL" field. Then click the "Test Call" button. This will send a test lead to Zapier. After a few seconds, you will see a "200 OK" message appear next to the button. Once you see this, switch back to Zapier and click the "Test trigger" button:
You should see the test data now in Zapier with a "we found a request!" success message:
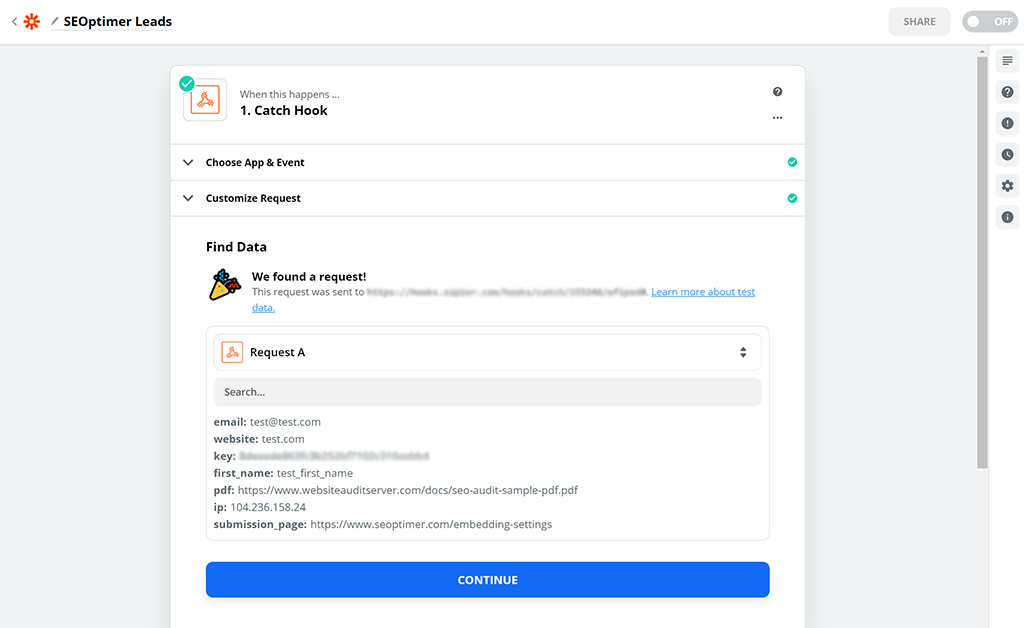
At this point your SEOptimer trigger is now set up in Zapier successfully. You'll notice in the test data the "key" field is sent by SEOptimer. This value will match your API key on the Embedding Setting page. We strongly recommend you set a condition in Zapier to check that these 2 values match each time the Zap fires. This will ensure the trigger is legitimately invoked by SEOptimer and not by a malicious 3rd party.
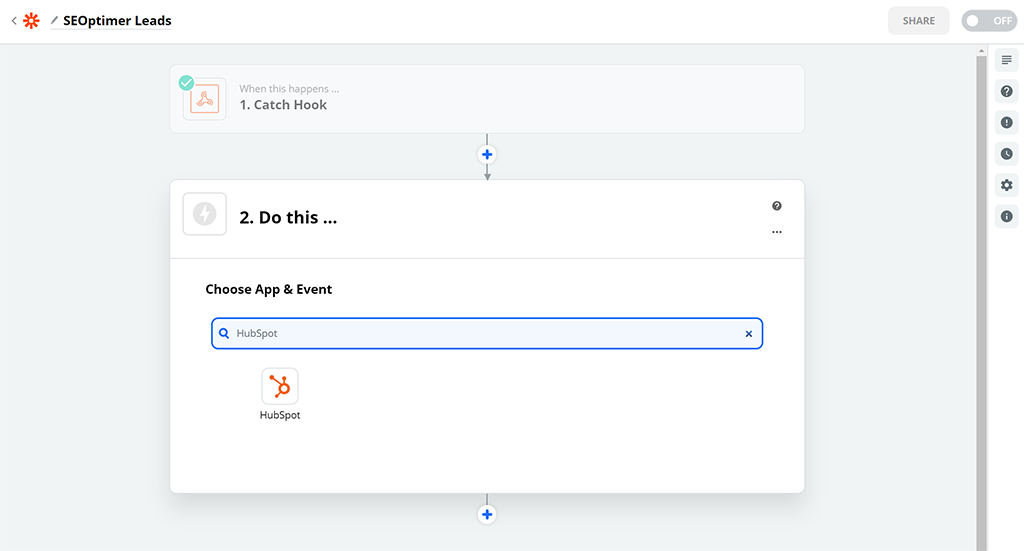
Now that your trigger is complete you can create the Action in Zapier to save the Lead data into any supported CRM like HubSpot or any other notification app like Slack:
Test the New Form
Once the form is installed, we recommend testing the updated page and submitting the form. Upon submitting you should be directed to your report, shown the confirmation message or redirected to another page (depending on what option you selected in the Embed Settings). Additionally, you should receive a new lead notification email and have a new lead record added to the Leads page.
Potential Issues and Conflicts
If for whatever reason the widget is not working within your website, we recommend performing some debugging on your site before raising an enquiry with SEOptimer. The most common cause of issues or conflicts are due to:
- Other plugins or add-ons interfering: some plugins append tracking parameters to any URLs on a website, or otherwise interfere with existing form logic
- Javascript compatibility: Part of our code includes a portion of Javascript code to validate the form. Other Javascript code on the page can interfere with this